

Introduction
Welcome to the Encrypted Message System 101, a program that is going to require you to write key components including basic ciphers to help encrypt the messages between clients. While this application is not ready for networking, it is very similar to a basic email application.
In addition to writing the code, you will be learning to use an Integrated Development Environment (IDE), and in particular for this class, you will be using IntelliJ. While you are technically free to use other IDEs, the TAs will not be able to support you with other environments.
These instructions have been written for the Eclipse IDE, and minor changes will be needed when using IntelliJ (This is due to a last minute change in the lab machines).
What you will learn
- String manipulation
- charAt
- substring
- indexOf
- Reviewing classes
- getters / setters
- Simple methods
Setting Up Your IDE - Eclipse
CS 163/4: Java Programming (CS 1) uses the Eclipse Integrated Development Environment (IDE) for developing Java code. Eclipse is favored as a premier tool in academia and industry. A standard installation of Eclipse is available on all CS Department Linux computers for use by CS163/4 students. As a default, it will be assumed that students use this version on CS Department Machines. Basics of how to use the Eclipse IDE productively will be covered somewhat in lecture and more extensively in course recitations. Lab machines are currently using the Oxygen version of Eclipse, which is version 4.7.2. Eclipse documentation is found here
Eclipse can also be downloaded for free and installed on most platforms. Eclipse is written entirely in Java, so it will operate properly on most any platforms that support Java. This includes Linux, Solaris, Mac OS X and properly configured Windows platforms. It is assumed that many students will find it possible to install and use Eclipse on their own computers, and the instructor and GTAs will try to help informally. However, successful installation and use of tools such as Eclipse on your own machine demands some understanding of how to install and use new software on that platform, and ultimately it falls to the individual student to either succeed at such an effort or to use the resources already provided by the CS Department. The help that can be offered by the instructor and GTAs is by necessity limited.
If you decide to run Eclipse on your system, make sure you download and install the Java Development Kit (JDK) first from here. The current version of Java on department systems is 1.8 (Version 8). After installing Java, download and install Eclipse from here. Select the version called Eclipse IDE for Java Developers. In both cases make sure you select the correct operating system.
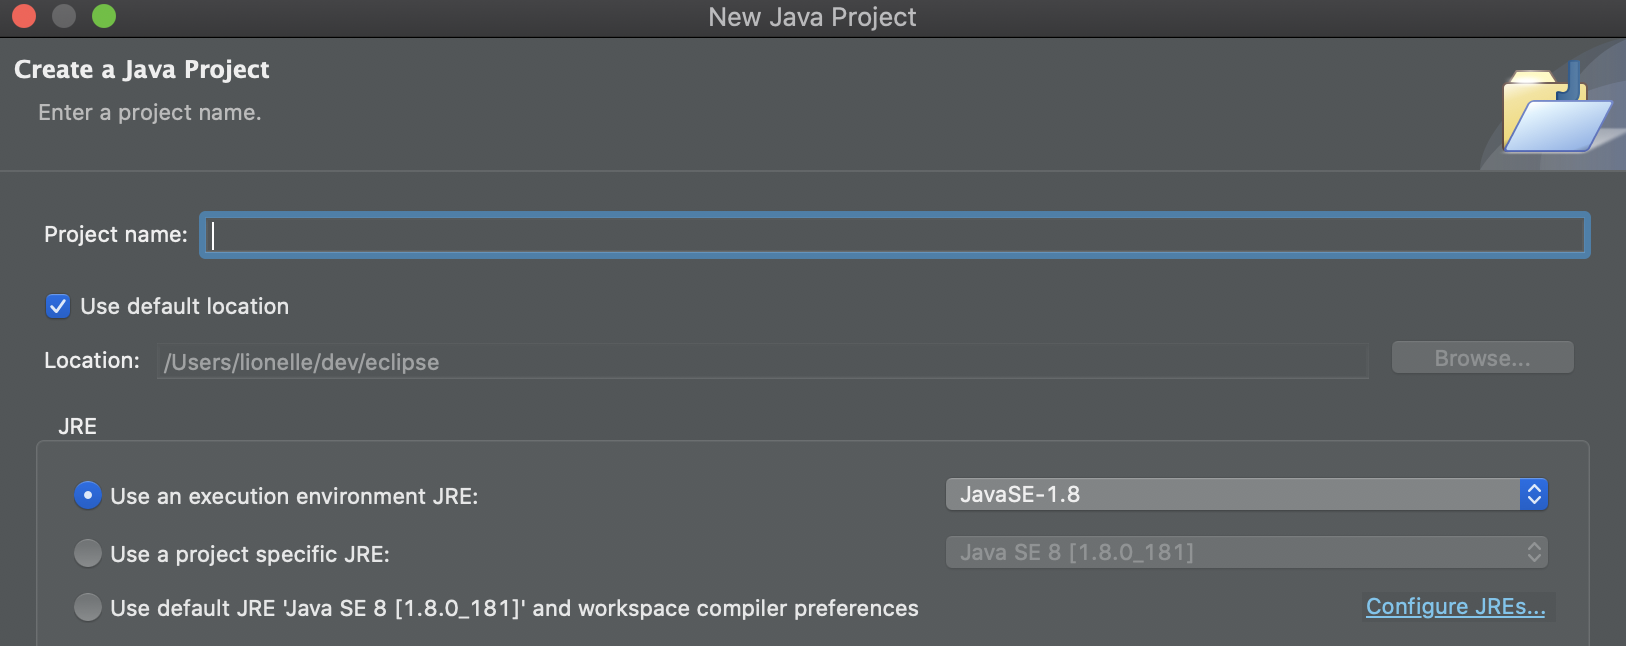
Creating an Eclipse Project
Before you download the files from zybooks, you will want to create a project in eclipse. To create a project, go to File -> Java New Project. Name your project something meaningful, such as P2. After you create the project, go to the code in zybooks by clicking through the link in canvas.
Downloading The Template Files
You will notice with the files, that you will have to download them, and not work in zybooks.
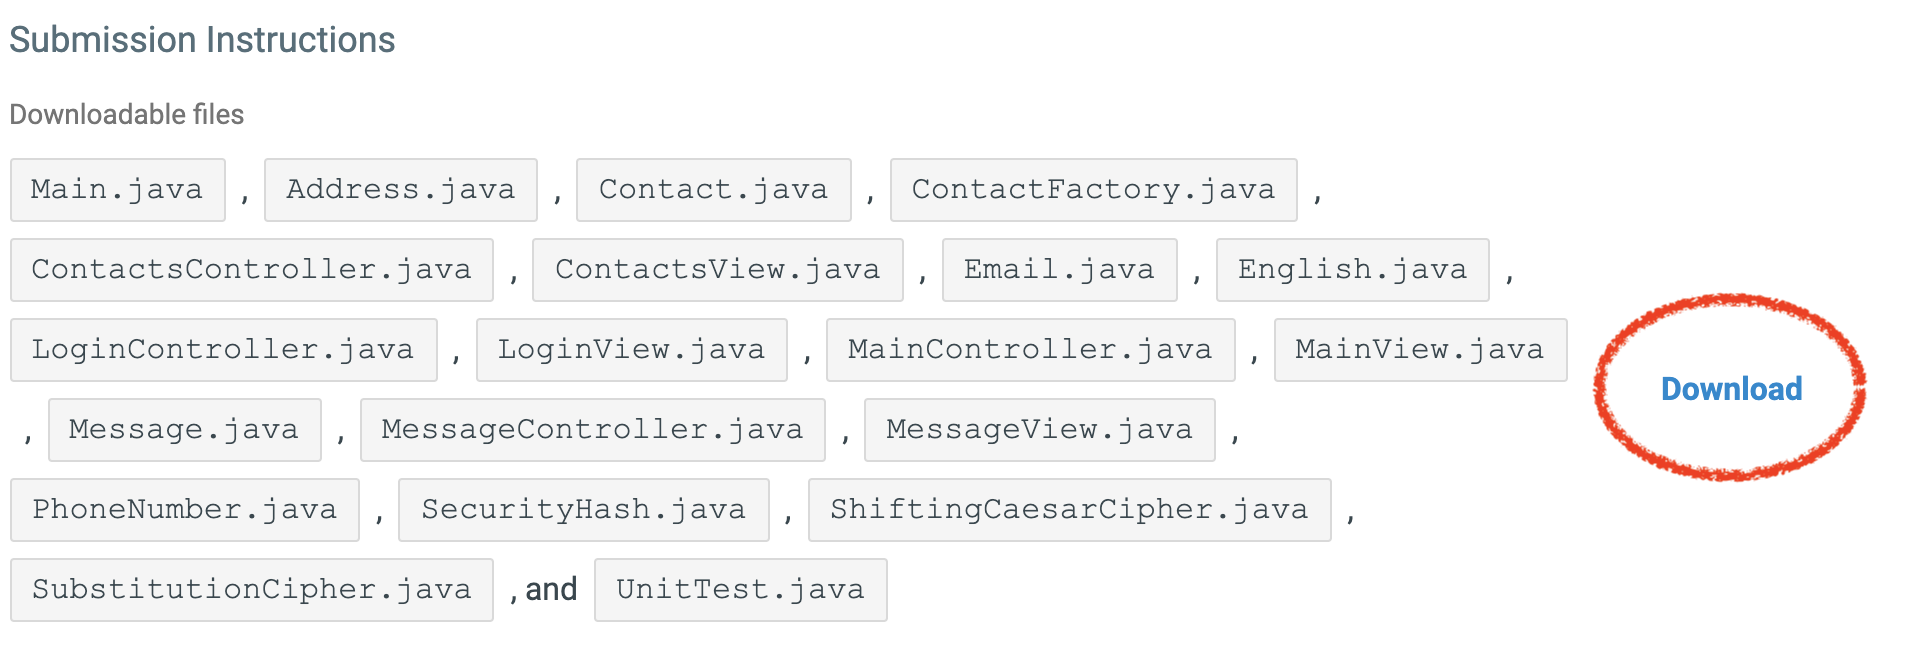 When you click the download button (image shown on the right), it will download the files as a zip archive. For
many browsers such as chrome, you will see the download at the bottom left with an arrow by it. If you click
on the arrow, you can see where the file was downloaded. For most computers, it will have been downloaded
to the Downloads folder.
When you click the download button (image shown on the right), it will download the files as a zip archive. For
many browsers such as chrome, you will see the download at the bottom left with an arrow by it. If you click
on the arrow, you can see where the file was downloaded. For most computers, it will have been downloaded
to the Downloads folder.
From this point, you have two options to copy the files into your project:
Option 1: Directly copying files
Navigate to your downloads folder (Mac OS Instructions and Windows Instructions), and extract the zip file. This is often done by double clicking, but you can also right click to extract. You can then copy the files into the src directory in your project.
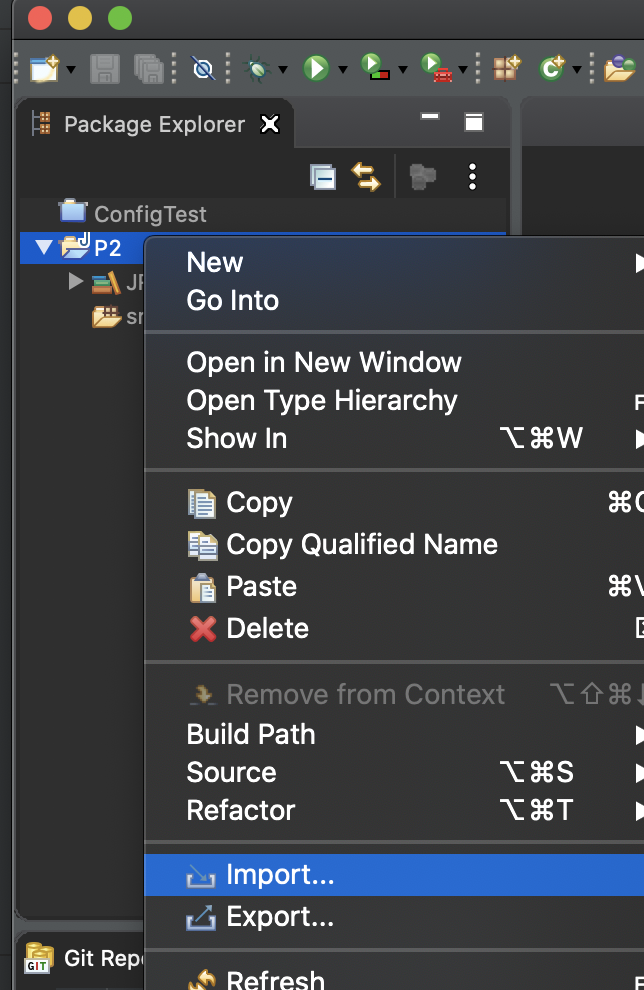
Option 2: Using Eclipse’s Import
Go to eclipse right click on your project folder and go down to import, as shown in the screenshot. Your project name may be different.
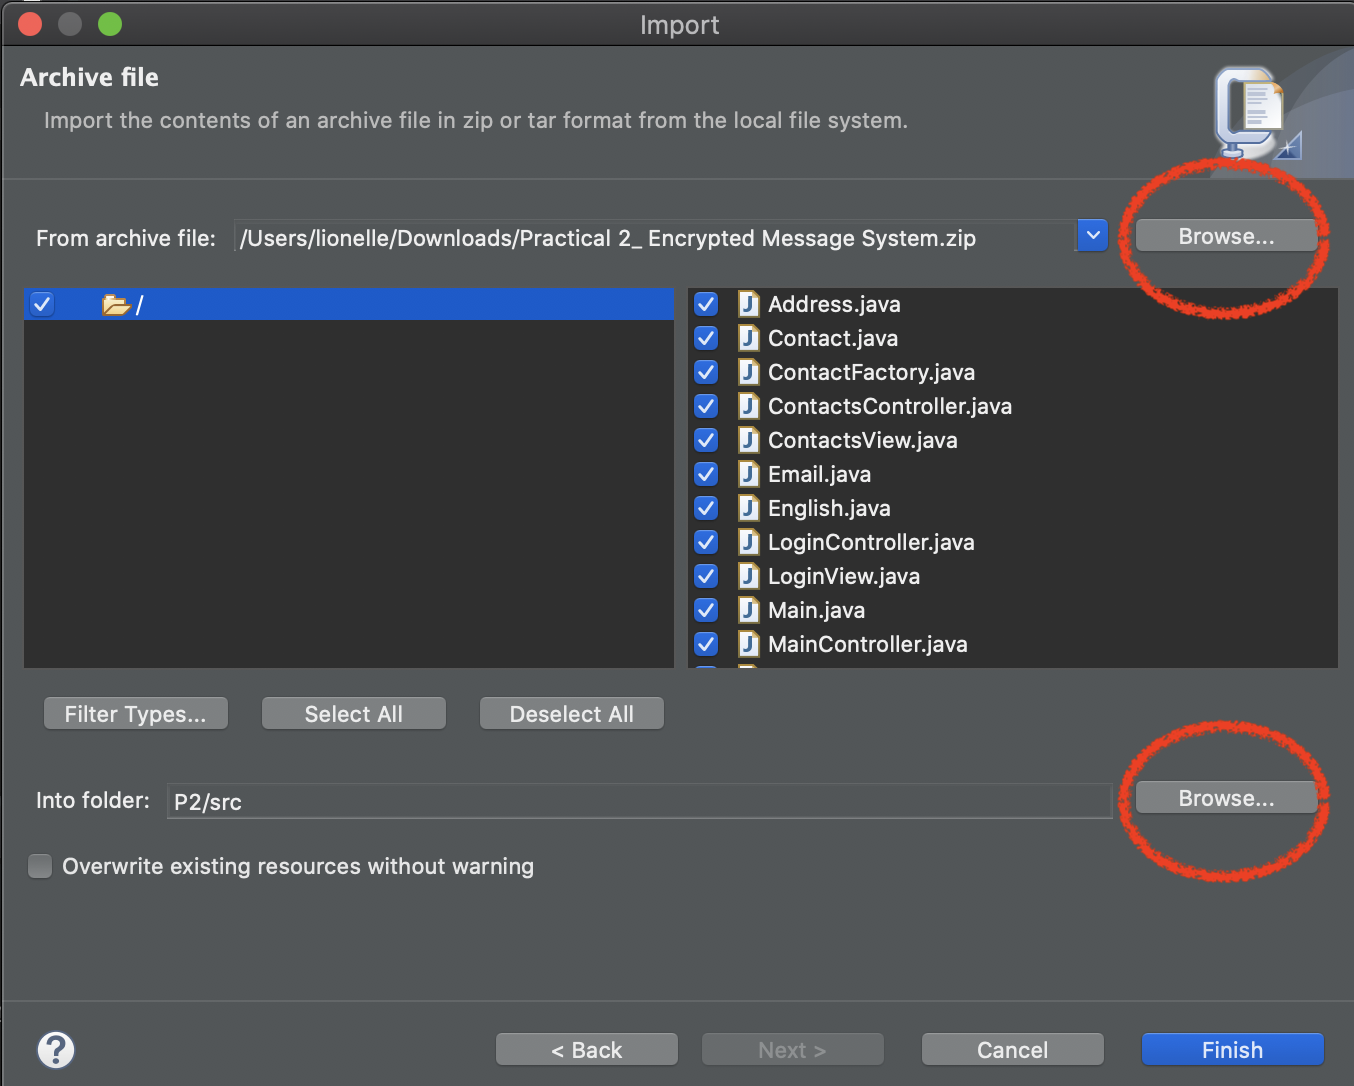
- Click on the General->Archive File, and click next
- Select the file in your file system. This is more than likely in your downloads folder, and you can click browse to navigate your zip file to find it.
- Select the destination directory, which will be your src directory (src is short for “source”). There is a browse button next to the destination or “into folder”.

Running the program
 After you import code, one of the best things is simply to run it to make sure it compiles. As you haven’t
setup a ‘run configuration’ for your project, you will need to do that now.
After you import code, one of the best things is simply to run it to make sure it compiles. As you haven’t
setup a ‘run configuration’ for your project, you will need to do that now.
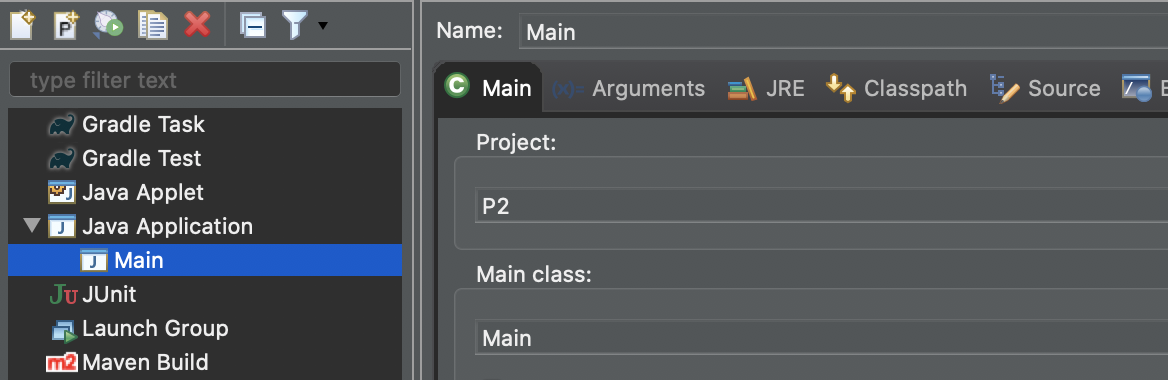
- First select your Main.java file in the src files in eclipse. If you double-click it, it will open.
- Select the small black drop down arrow next to the green circle button with an arrow on it (run), and then select Run Configurations…. You can also go the run menu at the top of eclipse, and go down to Run Configurations…
- Double click the Java Application, and it will generate one for the Main.
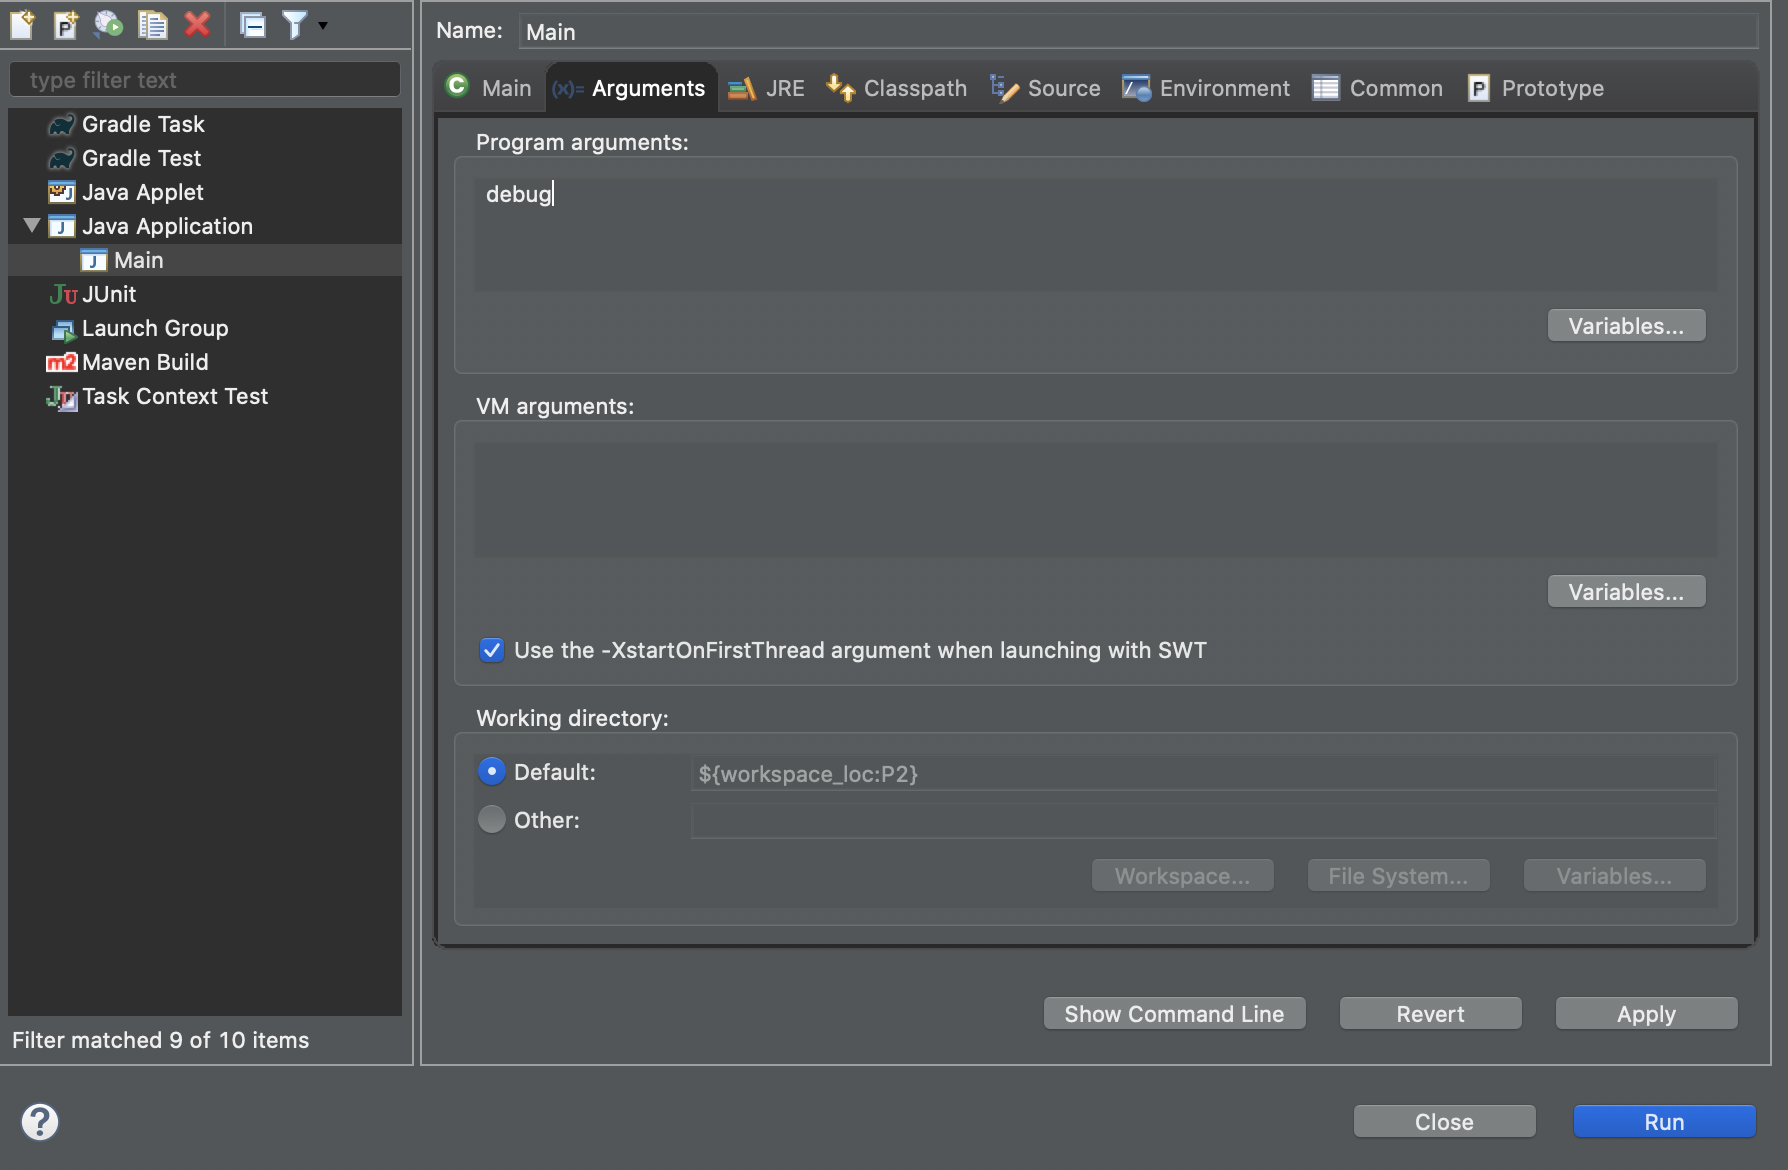
- This program also has the option to run in a debug mode (you will see that if statement in the main method), and we recommend running with debug first. As such, you should go to the program arguments tab, and type in debug.
- Click run to run the program
- From this point on, you can just click the giant green button to run it.
- To run it without the debug option, you will need to go back into Run Configurations… and remove the “debug” from the program arguments.
At this stage, if you have run your program, very little will print out. That is fine, it just means you got your program loaded into your IDE and compiled.
Files
One thing you will notice about this program is that there are a lot of files. However, this is because the contents of the files are relatively short. This application is also designed in the model-view-controller paradigm.
- view classes (all view classes are readonly)
- ContactsView.java
A view that helps display a contact to the console. - English.java
This is stores all the Strings that the views use to print to the console. This could be swapped with another language to provide localization options. - LoginView.java
Displays the initial login sequence (login/password). - MainView.java
The main menu of the application, asking to look up contact, login, exit, and read/compose messages. - MessageView.java
Displays both the information to compose a message and to read a message.
- ContactsView.java
- controller classes (all controller classes are readonly)
- ContactsController.java
Controls program flow between the contacts model and the view. - LoginController.java
Handles login including password authentication. - MainController.java
Handles main menu actions, and passing information between different controllers. - MessageController.java
Handles composing and displaying a message.
- ContactsController.java
- model classes
- Address.java (readonly)
Stores address information for the contact. Read only as an example for other model classes. - Contact.java
Stores the combined contact information. - Email.java
Stores email information about a contact, including splitting up the email lines based on component. - Message.java
Stores a message in the system, including the encryption type. - PhoneNumber.java
Stores a 10 digit phone number.
- Address.java (readonly)
- security classes
- SecurityHash.java (readonly)
It is common to hash passwords before storing them in a database (or should be common). This file help secure the client’s password by hashing it. - ShiftingCaesarCipher.java
A modified version of the Caesar Cipher for “encrypting” messages - SubstitutionCipher.java
A class that implements a Substitution Cipher for encrypting messages.
- SecurityHash.java (readonly)
- other classes
- ContactFactory.java (readonly)
Contains information for different contacts. - Main.java (readonly)
Entry point for the program. - UnitTest.java
Tests to help you build the application in steps.
- ContactFactory.java (readonly)
After looking through the files, you should go to canvas and take the code tracing quiz for Practical 2.
Pro Tip
Most of these files would have been separated into packages based on the breakdown above. However, zybooks auto-grader doesn’t current support packages, which is why they are not in packages. To read more about java packages, this is a good resource.
Step 1 - Email: getter and setters
Now you have looked through the code, let’s start with working on the Email data class. We use the term dataclass, as email simply holds the email, and returns information about it. Good design of your data classes makes the rest of the application easier. Most data classes have a number of accessor and mutator (getter/setter) methods that match the private variables.
You should implement the following methods in Email.java
- setEmail(String email)
- getEmail()
- setType(String type)
You do not need to validate the type. Just set whatever String is in the parameter tothis.type. - getType()
Testing Email: getters and setters
You should run your program with the debug command line argument now. You will notice
both of those methods are tested in UnitTests.testEmail(). It, however, only tests one
email address, so you may want to add a second set of tests here.
Step 2 - Email: getEName() and getDomain()
The getEName() and getDomain() methods are return substrings of the email. For a quick review of substring, go here and here.
For getEName(), you want to take the email substring from 0 until the indexOf the “@” sign. To review indexOf, go here.
For example, if I had a string, and I wanted to grab each side of a colon
1
2
String myString = "Star Trek:TNG"
String firstHalf = myString.substring(0, myString.indexOf(":"));
For getDomain(), you want the second half of the String after the “@” sign.
For example given the following email:
splashylemon@cs.colostate.eduThe return values would be
splashylemon  // getEName()
cs.colostate.edu  // getDomain()
Testing Email: getEName() and getDomain()
Once again run in debug mode, the above examples should show up. You will want to add additional emails. We are unconcerned about cases with more than one @ sign as that is invalid email/against email specification.
Step 3 - Email: render()
The render() methods in all the classes with them are about returning formatted Strings. The format for the email is as follows:
Home:   splashylemon@cs.colostate.edu
Office: splashylemon2@cs.colostate.edu
The type is formatted with 7 characters of padding (%7s), and the email is provided as is. You do not have to worry about types over 7 characters.
Hint: use String .format, getType() and getEmail().
Testing Email: render()
Once again, run the code with the debug argument to see the Unit Tests, and you should add your own. This is the last method to complete in Email, so you will really want to add additional emails.
Step 4 - PhoneNumber
You will want to go to PhoneNumber.java and implement the following methods
- getType
- setType(String)
Once again no need to check type, any String is allowed. - getNumber()
returns the raw number - setNumber(String number)
sets the number (10 character string, digits only). You do not need to confirm the string format that is done in another class. - getAreaCode()
Uses substring to get the first 3 digits of the number. - getPrefix()
Gets the next three digits (so 4-6) as a string, uses substring - getLine()
Gets the last four digits. Remember with substring, if you only put in one parameter, it gives you the remainder of the string from that point.
Additional Methods
getPrettyNumber()
Combines String.format with getAreaCode(), getPrefix() and getLine() to return a pretty formatted
phone number.
The format would be as follows for 9708675309:
(970) 867-5309render()
Uses getPrettyNumber() and getType() to build a formatted String. Like Email, the type
should have 7 padding. For example:
Home:   (970) 111-5309
Office: (970) 111-1101
Testing PhoneNumber
You should test every method after writing every method (i.e. don’t wait until you write all methods). To run the tests, you will need to uncomment out the call to tests in UnitTest.java as follows:
1
2
3
4
5
6
7
8
9
 public static void runTests() {
   testEmail();
   testPhone();
   //testContact();
   //testCaesarCipher();
   //testSubstitutionCipher();
   //testMessage();
   //...
}
You will also notice, only one number is tested, so you will want to add in additional numbers in the tests.
Step 4 - Contact: cleanNumber(String number)
The goal of the cleanNumber method is to remove everything that isn’t a digit, and keep everything that is a digit. Given a String of any length, remove the characters that are not numbers (0-9) and return the String of numbers that are left.
Example: Given the input “12tes34ting”, the output should be “1234”.
For the cleanNumber method, you will make use of loops, String .charAt(int), StringBuilder
and the Character class method isDigit.
The important part about StringBuilder is the append method, as you will be appending to a string as you iterate through each character. For example, if I wanted to remove all whitespace while building a new String, the code would be as follows:
1
2
3
4
5
6
7
8
9
10
11
public String example() {
  String line = "my line with spaces";
  StringBuilder lineNew = new StringBuilder();
  for(int i = 0; i < line.length; i++) {
     char tmp = line.charAt(i);
     if(!Character.isWhitespace(tmp)) {
        lineNew.append(tmp);
     }
  }
  return lineNew.toString();
}
Pro Tip
Why StringBuilder? If you recall, we mentioned Strings are immutable, which means they can’t be changed. Instead, every time you concatenate you create a copy of the String. StringBuilder allows for a mutable string, so you aren’t wasting memory copying the string over and over.
Testing Contact: cleanNumber(String)
You can uncomment the testContact(); in UnitTests, however, looking at that method, you will notice
we did not explicitly test cleanNumber. You may want to write your own lines of test to truly test it
to make sure it works.
Step 5 - ShiftingCaesarCipher
shift(char x, byte shift)
Now that you are warmed up, we are going to move to the encryption part of the program. The first part of writing a CaesarCipher is writing the shift method. The shift method in this case is a simple shift only (don’t worry about letters only, it can be unusual characters).
Remember divide-conquer-glue. This method is simple as you will use it in the next part. The only thing you
have to do is take character x, add byte shift to it, cast it back to a character (char) and
return the answer.
A shift in a Caesar Cipher is an amount that each character in a string is shifted by. An easy way to think about this is by assigning numbers to each characters (see ASCII table), and then using those numbers to add a shift value to each one. For example, the character ‘a’ has an ASCII value of 97. Since characters can be treated like integers, we can add to them. If the shift value was 1, 97 + 1 = 98, which is the ASCII value of ‘b’. Using casting, we can now convert the integer value back to a character. This method should only do the shift for a single character, as you will want to call this method in your simpleCeasarEncode method.
simpleCaesarEncode(String str, byte shift)
The purpose of this method is to take a String and return an ‘encoded’ string with
every character shifted. You will make use of the shift method, and your experience
with StringBuilder and looping through a string using .charAt. Here is a suggestion:
First practice looping through the String pulling the character using .charAt. Second, take that character and call the shift method Third, append the result from shift to the StringBuilder
If you try to do more than that, you are doing too much.
Testing ShiftingCaesarCipher
In the unit tests, uncomment the testCaesarCipher();. Make sure to run a lot while writing these methods.
Step 6 - SubstitutionCipher: encrypt(String str, String mapTo, String mapFrom)
You will want to work on the SubstitutionCipher next. While the code for this is not complex, it takes a moment to wrap your head around the problem. You should draw out what you want to do on paper first before coding. Namely, what is a substitution cipher? If you had two Strings of the same length, what do they share in common (they both have indices from 0..n). If you place the mapFrom on top of the mapTo on your page, and then write the indices between them - you see a pattern. Finding the index of a letter in mapFrom, gives you the character to replace it with in the mapTo.
For example,
if your mapTo is di3kj and your mapFrom is abcde, and the word you want to
encrypt is abba. I take a, find the index in abcde (0), and then use that index to find the charAt
that index in the replacement String (d). we would then append the answer, so builder
would eventually have diid. Please note, if the character is not in the mapFrom, that means
you don’t do anything, and leave the character exactly without changes.
Useful methoods to complete ‘your quest’ are:
- indexOf(String)
- String.valueOf(char) // gives the String rep of a character
- charAt(int)
- contains(String) // returns true if parameter is in string
Testing encrypt(String str, String mapTo, String mapFrom)
In the unit tests, uncomment the testSubstitutionCipher();. It may help to work out the
answers on a piece of paper, as an OB1 error
will be very hard to track down.
Step 7 - Finishing up Message
Message.java has the following mutators and accessors that need to be implemented.
The methods that handle the encryption are completed for you, but it still needs the
direct getters and setters. All of the getters and setters below
are direct without any extra checking or changes (e.g. for setMessage, just
set the parameter to this.message).
- getMessage()
- setMessage(String message)
- getEncryptionType()
- setEncryptionType(String encryptionType)
- getFrom()
- setFrom(String from)
- getTo()
- setTo(String to)
- getSubject()
- setSubject(String subject)
You should read the provided code.
Testing Message
Uncomment testMessage(); in UnitTests.java runTests(). You should also add your own tests.
Step 8 - Run the program, and turn in.
You have now been working through the program, but wouldn’t it be more fun to run the actual program? Go into your Run Configurations and remove the debug String from the program arguments and run the program again. You will be presented with a login screen.
Welcome to Encrypted Message System 101
Please enter your e-name > awonder
Please enter your password > alice
Click down in the run area to enter the eName and password. As a review, you can find all the passwords for the system by looking at ContactFactory.
With that said, here are the pairings
| ename | password |
|---|---|
| awonder | alice |
| madhatter | hatter |
| offwiththeirheads | red |
| vanishingcat | cheshire |
| late | rabbit |
| necro | queen |
| hookahblue | caterpillar |
You can log in as different clients, and leave messages for them. Try leaving different types of messages, and then logging in as that client.
Step 9 - Submitting to Zybooks
By clicking through canvas, click the link to the zybooks lab again. The lab will ask you to submit files. Hint, you can highlight all files in the directory, and it will only take the files allowed for submission. If you have been debugging this entire time, you should have minimal things to fix, however, if you tried writing it all at once, this step becomes the hardest step.
Step 10 - Reflection
Please complete the reflection in canvas now. Something to consider in your reflection, this application is stateless. That means whenever the application closes all information is lost - including the messages. How would you keep state between times when the application runs? If you think about it, a word file is storing the ‘state’ of what you are typing. In practice, email works by storing files on the server for retrieval by the client!
Going Further
If you enjoyed this application, you really will want to look at the Networking and Cyber Security Concentration for computer science (netsec). You can also learn more about the field. Additionally, what happens if you scale the program up to 1,000,000 clients or more? Computing Systems is critical to understanding how we scale applications for large audiences, among other areas.