CS270 Recitation 9: The Stack
This recitation has a attendance and assignment component in Canvas:
R9 is the attendance component, R9 Checkin is the assignment component.
See Canvas for the due dates.
Goals
- To teach you the LC-3 stack protocol.
- To apply the stack protocol to implement a recursive function.
- To prepare you for P7.
The Assignment
In this recitation, you will be implementing the factorial function in
assembly using recursion and turning in factorial.asm via Checkin.
Recall that n! = n * (n - 1) * (n - 2) * ... * 2
* 1. This can also be expressed as n! = n * (n - 1)!
Here is a C implementation:
#include <stdio.h>

int Param = 0x0004;
int Result;

/** Compute N! recursively */
int Factorial(int N) {
  int Temp = N - 1;

  if (Temp > 0) { // This is the same as checking if N > 1
    // Recursive call
    return N * Factorial(Temp);
  } else {
    // Base case (N <= 1)
    return 1;
  }
}

/** Entry point */
int main() {
  Result = Factorial(Param);
  printf("Return value is x%04X\n", Result);
  return 0;
}
We want to implement this program in assembly. Unfortunately, it is not
trivial. When calling subroutines in assembly, we have to worry about issues
such as potential conflicts when using the same registers in both functions
and the restoration of the return address. These issues are made more obviuos
when implementing recursion.
Because of this, we will be using the stack protocol, a set of rules
that allows the program to keep track of function calls. You are already
familiar with some of it: every time a function is called, an activation
record for that function is pushed into the stack. The activation record
keeps track of the data needed to run the function and to return to the
calling function after completion. It includes parameters, bookkeeping
information, and local variables. In a high-level language such as C, the
compiler takes care of generating the code that builds and stores an
activation record in the stack. In assembly, we will need to take care of the
low-level details for building each activation record.
The stack protocol that we will use for the LC-3 is as follows:
- Step 1: the caller pushes the parameters for the callee in reverse
order. This step is optional because the callee may be a function that takes
no parameters.
- Step 2: the caller calls the callee using JSR.
- Step 3: the callee allocates space in the stack for the return
value. This step is optional because the callee may be a void function.
- Step 4: the callee pushes the return address (the current value of
R7). This is similar to making a backup of R7 in a label, except that we are
storing it in the stack instead of a label.
- Step 5: the callee pushes the previous frame pointer. Each
activation record has a frame pointer that points to a fixed location within
the record. This allows a function to access all the different parts of its
activation record by using the frame pointer as a base address. The frame
pointer is stored in R5 (by LC-3 conventions). Hence, in this step, we
push the value of R5 into the stack. In our convention, the first frame
pointer (before any function is called) is x4000.
- Step 6: the callee sets up its own frame pointer. It involves
updating R5. The convention is to make the frame pointer point to where the
first local variable is (or would be).
- Step 7: the callee allocates space for local variables. This step
is optional since the callee may be a function without local variables.
- Step 8: at this point, the activation record for the callee has
been fully built. The callee can now execute its body. In this step, the
function will need to update the return value in the stack if
necessary.
- Step 9: it is now time to start popping the activation record out
of the stack. In this step the callee pops the local variables.
- Step 10: the next thing in the stack is the previous frame pointer.
The callee pops it into R5 (to restore the previous frame pointer).
- Step 11: the next thing in the stack is the return address. The
callee pops it into R7 (to restore the return address).
- Step 12: the callee can now return to the caller using RET.
- Step 13: the next thing in the stack is the return value (if the
callee is a non-void function). The caller can pop it into a register for
its own use.
- Step 14: the only things left in the activation record are the
parameters. The caller pops them out (if any).
In order to keep track of the top of the stack, we will use register R6. This
is a convention. Therefore, your function should not modify this register
unless you need to change the stack pointer. It represents the address of the
element at the top of the stack. Initially, R6 is x4000. Every time something
is pushed into the stack, R6 is decreased and the element is stored at the
resulting address. Every time something is popped, the element at the top of
the stack is retrieved and R6 is increased. You also do not want to mess with
R5 since that is the frame pointer. Finally, as usual, you should not mess
with R7. Because of these restrictions, you will need to be cheap with
registers.
Getting Started
- Your TA will illustrate the stack protocol with a simple example. Pay
full attention because it is easy to get lost.
- Make sure you fully understand the C program above before proceeding. You
can also try it by downloading it from here:
factorial.c. Compile it and run it with
different values for Param until you are comfortable with the C
implementation.
- Make a subdirectory called
R8 for the recitation; all
files should reside in this subdirectory. Copy
factorial.asm to the R8 directory.
- The structure of the program has been provided to you. It resembles the
structure of the factorial.c file shown above. We have also provided you
with the function body. Your goal is to fill in the blanks (starting at
Step 1 in the Main subroutine). You cannot do this blindly. You must
understand what is happening at every point in the program. For programming
assignment P7, you will need to implement the program essentially from
scratch (no fill-in-the-blanks). If you are not drawing the stack as you
complete the code, you will probably get lost. Each blank that you must
fill is a single line. If you need more than one line per blank, you are
doing it inefficiently and your program will not receive credit in the
auto-grader.
- Once you have code that assembles, load it in the simulator. Before
running it, try drawing what the stack looks like at different points in
the program:
The program starts by calling Factorial(4). It will get to the line
labeled Checkpoint1. Draw the stack as it should appear right before this
line gets executed (if an element has not been initialized or is no
longer in the stack, write N/A):
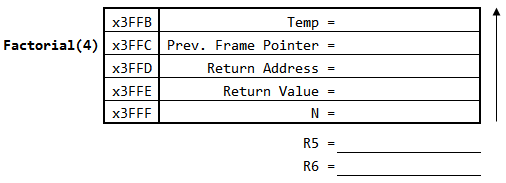
Run the simulator until Checkpoint1. Go to address x4000 and check if
the stack you drew agrees with the simulator.
The program continues by calling Factorial(3). Factorial(3) will call
Factorial(2), which in turn calls Factorial(1). Factorial(1) is a base
case. It will get to the line labeled Checkpoint2. Draw the stack as it
should appear right before this line gets executed:
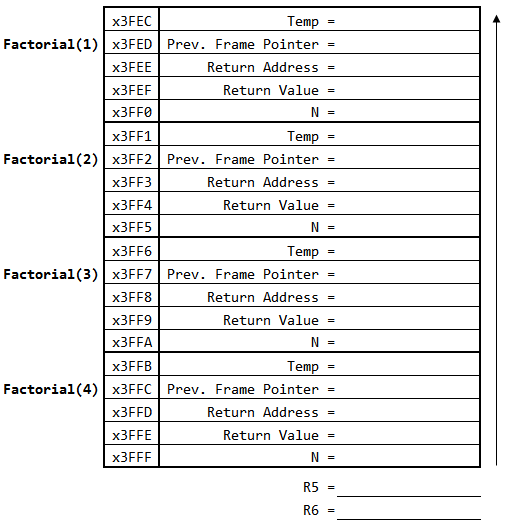
Check your stack in the simulator. You may have to press Continue
multiple times until you reach Checkpoint2 for Factorial(1).
- Run your program up to the HALT in the Main subroutine. Check that the
result of Factorial(4) was stored in the Result label. It should be
x0018.
- Turn your factorial.asm program in using Checkin.